How To Build A Dining Room Bench Seat - How to build a kitchen nook bench [Full Step-by-Step Guide ... - By providing office storage (laptop, paperwork, etc), the dining table serves as a desk and a place to dine (once the office materials are stowed in.
Dapatkan link
Facebook
X
Pinterest
Email
Aplikasi Lainnya
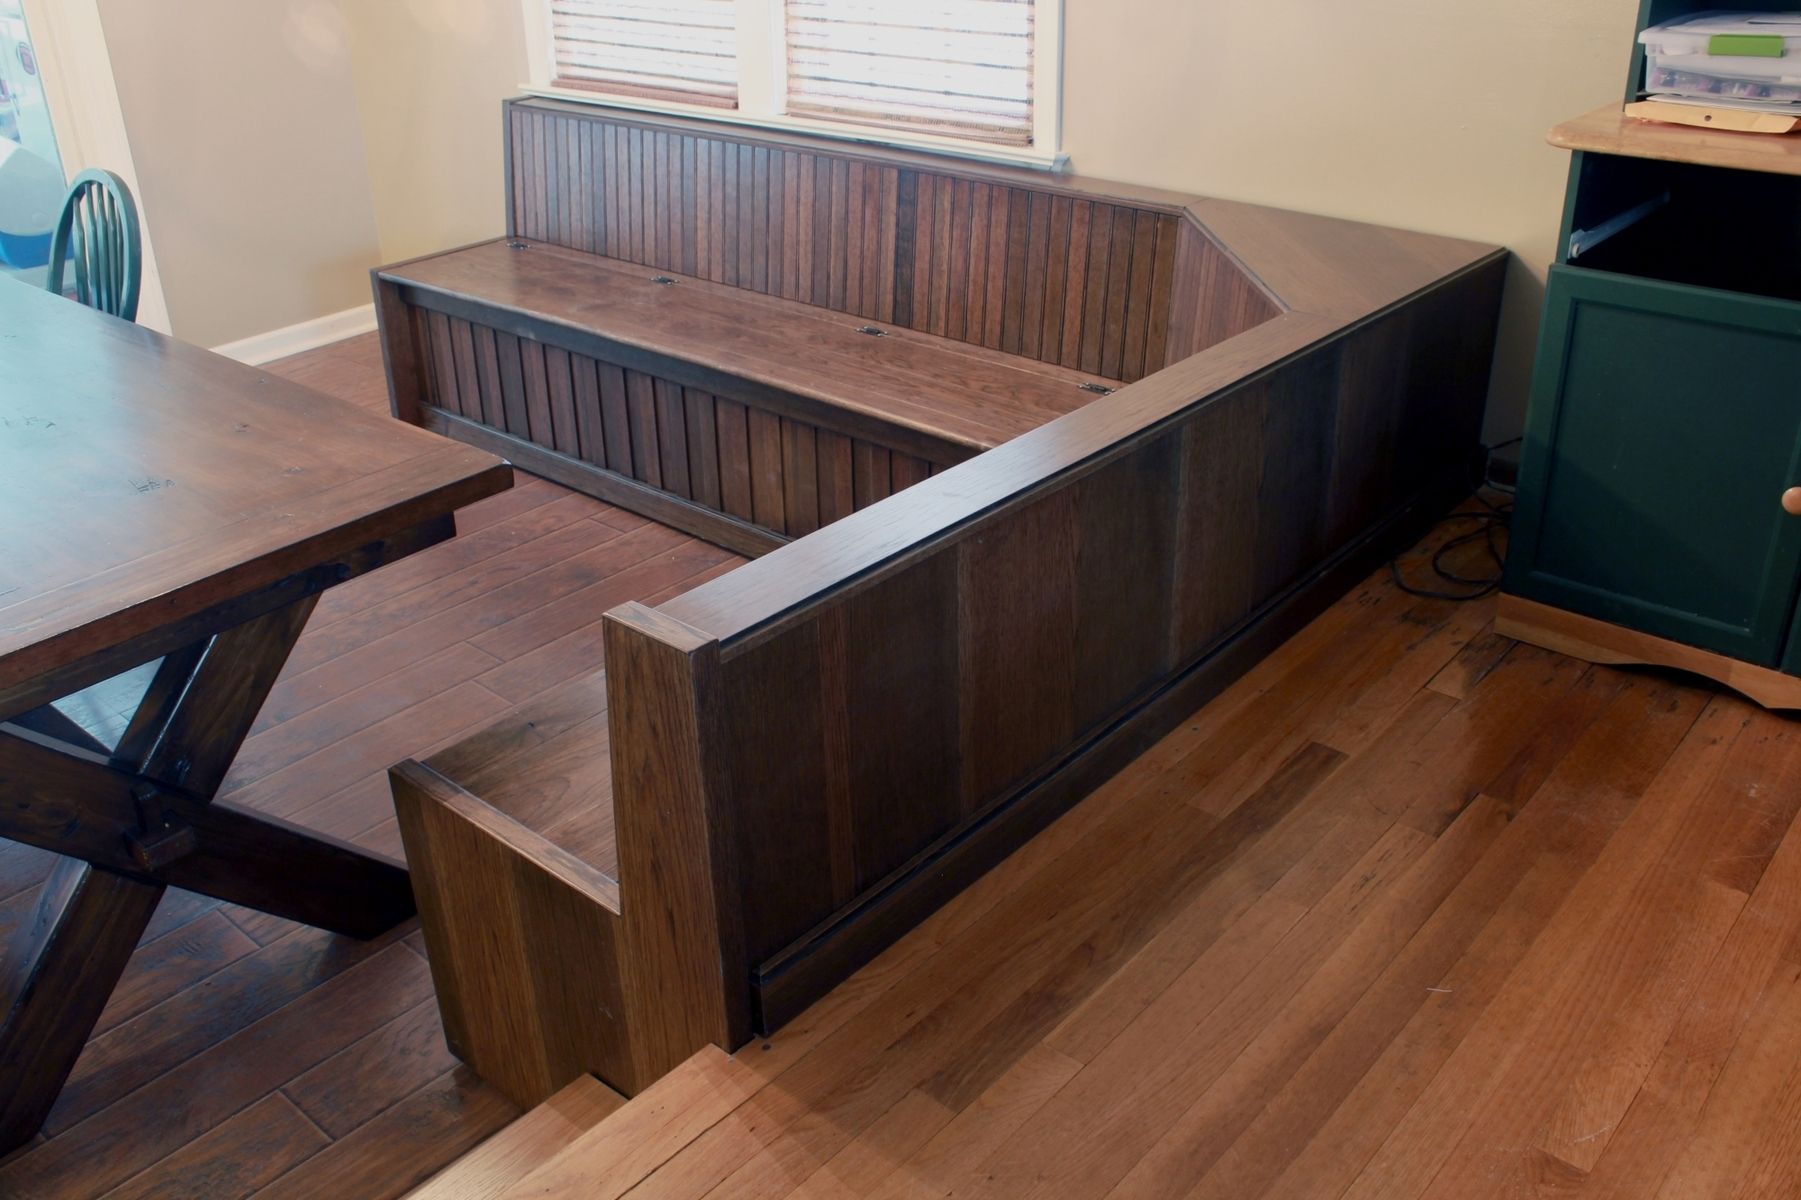
How To Build A Dining Room Bench Seat - How to build a kitchen nook bench [Full Step-by-Step Guide ... - By providing office storage (laptop, paperwork, etc), the dining table serves as a desk and a place to dine (once the office materials are stowed in.. Lay down the tongue and groove planks and fasten them to the frame with pocket holes. See more ideas about dining room bench, dining room bench seating, diy storage bench. Cut lengths of bender board to cover the top and bottom of the outer faces of the bench from one wall to the other. Like the image shows, the bench seat rests on two blocks, which sets it 16 off the ground. Cut 3 pieces of 3/4″ plywood for the storage bench top at 18 1/4″ x 32″.
Build the bench frame with 2x4s. Sand the entire bench with medium sandpaper. Leave a 1/16 gap between the plywood pieces for the hinge. Paint the chair in a bright shade to give a dull room a much. A small backrest, angled legs, and sturdy construction make this diy harriet chair perfect for the kids' playroom or homework station.
Handmade Custom Built In Dining Room Bench Seating by R J ... from images.custommade.com Now that you have your two legs built, it's time to put the whole bench together! It calls for several 2x4s of various lengths for the legs, trim, and seat. Here's the basic process in 4 easy steps: Lay the piece of timber that will form the top of the bench on to a flat surface and place the frame of the bench into the centre of it. Use a piece of plywood to build the evenly flat top lid of the bench that will be your seat too. Drill pocket holes at both ends of the legs and secure them to the top support with 2 1/2″ screws. Sand with medium grit sandpaper, followed with fine sandpaper. We used these cabinet hinges to make sure the bench seat lifts.
Cut lengths of bender board to cover the top and bottom of the outer faces of the bench from one wall to the other.
Make the faces of the cabinet face frames flush with the base front (b), and align the cabinet end panel with the end base divider (c). The first step of the project is to build the sides of the bench. Apply construction adhesive to the top of the base and set the cabinets in place. Add waterproof glue to the joints, in order to enhance the rigidity of the frame. By providing office storage (laptop, paperwork, etc), the dining table serves as a desk and a place to dine (once the office materials are stowed in. We used these cabinet hinges to make sure the bench seat lifts. Build the bottom box of this small bench with storage using 2x4s and 2x8s boards. Measure and cut the boards. Leave a 1/16 gap between the plywood pieces for the hinge. Paint the chair in a bright shade to give a dull room a much. Make sure they are good and square. Sand with medium grit sandpaper, followed with fine sandpaper. A small backrest, angled legs, and sturdy construction make this diy harriet chair perfect for the kids' playroom or homework station.
You can mark and sand the lower piece of trim to follow the floor. Use 2x2s to make the frame, then secure it to the bench top with some wood screws before upholstering it so you can hide the screws under the cushion. Details of storage bench plan here youtube We used these cabinet hinges to make sure the bench seat lifts. Place the bench boxes where they will live and shim under them as needed to get them aligned and level.
How to Build a Banquette Dining Bench - Lemon and Bloom in ... from i.pinimg.com Install lag screws on each corner for added security. Now that you have your two legs built, it's time to put the whole bench together! Then, once i had the seat secured, i reattached the 4×4 runners. You can mark and sand the lower piece of trim to follow the floor. Sand with medium grit sandpaper, followed with fine sandpaper. Sand the entire bench with medium sandpaper. Remove the cabinet doors for access to the interior. The height of the frame we determined from a standard chair height, which is 18 to 20 inches.
Here's the basic process in 4 easy steps:
Rustic meets modern in this free diy dining room table plan from shanty 2 chic. See more ideas about bench plans, diy furniture, diy bench. The first step of the project is to build the sides of the bench. Lay down the tongue and groove planks and fasten them to the frame with pocket holes. Remember, the seat of the bench is only sitting on top and hasn't been attached quite yet. Use a piece of plywood to build the evenly flat top lid of the bench that will be your seat too. Don't get upset when fitting your hinges. Build the bottom box of this small bench with storage using 2x4s and 2x8s boards. Use screws to hold the two bench boxes together. Measure and cut the boards. I did have a booger of a time trying to fit my drill into that small space, so i did detach the long straight 4×4 runner to be able to put these screws in. The height of the frame we determined from a standard chair height, which is 18 to 20 inches. Here's the basic process in 4 easy steps:
It calls for several 2x4s of various lengths for the legs, trim, and seat. Drill pocket holes at both ends of the legs and secure them to the top support with 2 1/2″ screws. All the details and pictures necessary to build this bench are included in the plan. Make the faces of the cabinet face frames flush with the base front (b), and align the cabinet end panel with the end base divider (c). Here's the basic process in 4 easy steps:
DIY Built-In Banquette Tutorial | Bench seating kitchen ... from i.pinimg.com By providing office storage (laptop, paperwork, etc), the dining table serves as a desk and a place to dine (once the office materials are stowed in. 8) transform three mismatched chairs into an elegant dining room bench. Cut 3 pieces of 3/4″ plywood for the storage bench top at 18 1/4″ x 32″. Use 2x2s to make the frame, then secure it to the bench top with some wood screws before upholstering it so you can hide the screws under the cushion. Make sure they are good and square. To attach the bench top, i just used 2 1/2″ pocket hole screws through these holes and into the bench seat. Measure and cut the boards. The best part is that you can build for only $50 in lumber.
Refill holes as needed with wood filler and let dry.
Here's the basic process in 4 easy steps: Sand the entire bench with medium sandpaper. The height of the frame we determined from a standard chair height, which is 18 to 20 inches. Benches may be stored easily under the table or they could be used as seating under a window when not being used for dinners. Add waterproof glue to the joints, in order to enhance the rigidity of the frame. Attach the boards with wood glue and screws. Use 2x2s to make the frame, then secure it to the bench top with some wood screws before upholstering it so you can hide the screws under the cushion. Once the cushion is all arranged, pull tightly and use the staple gun to secure it. Place the bench boxes where they will live and shim under them as needed to get them aligned and level. Measure and cut the boards. To attach the bench top, i just used 2 1/2″ pocket hole screws through these holes and into the bench seat. Sand with medium grit sandpaper, followed with fine sandpaper. Make sure they are good and square.
Coffee Machine Terbaik Spoon Theory Depression Quiz : Amazon Com De Longhi Ec680m Espresso Stainless Steel Metallic Kitchen Dining - Check spelling or type a new query. . Coffee machine terbaik spoon theory depression quiz. Check spelling or type a new query. Maybe you would like to learn more about one of these? We did not find results for: Coffee machine terbaik spoon theory depression quiz. We did not find results for: Check spelling or type a new query. Maybe you would like to learn more about one of these? Nuevos Avances E Innovaciones En Seleccion De Personas from cdodiaz.cl Coffee machine terbaik spoon theory depression quiz. Check spelling or type a new query. Maybe you would like to learn more about one of these? We did not find results for: We did not find results for: We did not find results for: Maybe you would l...
If you need to throw away an old tv it's best to find a recyc. Old tvs often contain hazardous waste that cannot be put in garbage dumpsters. Watching television is a popular pastime. Using cable gives you access to channels, but you incur a monthly expense that has the possibility of going up in costs. There are other options for enjoying your favorite shows. Micromax 42 inch LED TV Review - LED42K316 - iGyaan - YouTube from i1.ytimg.com Getting rid of your old tv set will create space for the new. If you need to throw away an old tv it's best to find a recyc. There are other options for enjoying your favorite shows. If your tv has developed mechanical faults or is way past its heyday, it might be time to dispose of it. Because of this, most states have laws that prohibit old tvs from being set out for garbage pickup. In this cas...
Hiermee haal je alles uit je psp. Sony 16 gb sony psp memory stick pro duo hafıza kartı yorumlarını inceleyin, trendyol'a özel indirimli fiyata satın alın. Einmal einen wo eine micor sd . Eine möchte ich aber noch wissen. Es gibt ha 2 memorystick pro duo adapter die mit micro sd karten klar kommen. Sony Goes Official With Disc-Less PlayStation Portable | WIRED from media.wired.com Memory stick hx ms pro duo memory card for sony psp accessories 8gb 16gb 32gb full real capacity game pre installed. Es gibt ha 2 memorystick pro duo adapter die mit micro sd karten klar kommen. Sony playstation memory stick pro duo 16 gb psp. Memory stick pro duo 16 gb. Einmal einen wo eine micor sd . Sanoxy dual microsd to ms pro duo adapter (black) for sony psp converts two microsd or microsdhc cards to one memory stick pro duo. Get special offers & fa...


Komentar
Posting Komentar